Quiddity-wp (talk | contribs) (→Unique wands: add AC Matter eater) |
Quiddity-wp (talk | contribs) (→Unique wands: link directly to the pages) |
||
| (37 intermediate revisions by 10 users not shown) | |||
| Line 2: | Line 2: | ||
While exploring through the caves in Noita, you can come across new wands on pedestals spread throughout the map, akin to those which can hold [[Potions|potions]]. Unclaimed wands create a sizeable shining light effect to make them easy to see, even through the unexplored darkness known as the Fog of War, which goes away once the wand has been picked up. Unclaimed [[Items]] also shine in the dark, but much more dimly. |
While exploring through the caves in Noita, you can come across new wands on pedestals spread throughout the map, akin to those which can hold [[Potions|potions]]. Unclaimed wands create a sizeable shining light effect to make them easy to see, even through the unexplored darkness known as the Fog of War, which goes away once the wand has been picked up. Unclaimed [[Items]] also shine in the dark, but much more dimly. |
||
| + | [[File:Wand examples.png|thumb|293px|Wand examples]] |
||
| − | |||
== Starting Wands == |
== Starting Wands == |
||
| Line 11: | Line 11: | ||
== Strategies & Tips == |
== Strategies & Tips == |
||
| − | * Remember to swap the positions of your wands around by dragging and dropping. Place wands in |
+ | *'''Wand-ordering''': Remember to swap the positions of your wands around by dragging and dropping. Place wands in predictable spots on your hotbar to allow for quick use. |
| + | **E.g. You might always keep your: Primary damage in position #1, teleport in #2, digging in #3, and storage in #4. |
||
| ⚫ | |||
| + | * '''Spare slot'''(s): Whilst exploring, you will likely find new wands you want to grab. Try to keep an empty slot or more. |
||
| ⚫ | |||
| ⚫ | |||
| ⚫ | * If an enemy cannot cast the wand (due to it |
||
| + | *'''Pausing the game''': When you click to pick up a wand it completely pauses the game, unlike looking at the Inventory screen. Pausing can give you some time to think. |
||
| − | * You can throw a wand currently in your inventory onto the ground by |
+ | ** You can throw a wand currently in your inventory onto the ground by drag-and-dropping it out of the inventory menu, throwing it nearer or further depending on where your target-reticle is. |
| − | * Unlike looking at the Inventory screen, trying to pick up a wand off the ground completely pauses the game. You can take some time to think, but action will resume immediately upon choosing what to do. |
||
| ⚫ | |||
| ⚫ | * Wands dropped in a pool of |
||
| ⚫ | ** If an enemy cannot cast the wand (due to it not having spells, or not having a high enough mana max, or containing only something like [[All Seeing Eye]]), then it is possible for the enemy to stand around and fire nothing. However, they may still use their normal attacks even while holding a wand (usable or not). |
||
| + | ** Some enemies have reflection abilities or shields, but can still hurt themselves. You might throw a wand with an [[Earthquake]] on it (and then run away!). |
||
| ⚫ | *{{anchor|Charmed wand}}'''Charmed Wands''': Wands dropped in a pool of [[Pheromone]] will cause them to come to life and start following the player as long as they are stained with the liquid. However, these charmed wands will disappear after a few minutes, so it is advised to only apply this strategy when a wand is no longer needed, but more firepower is. Note: The wand's entire hitbox must be covered, which might require throwing it into a slightly deeper pool, or digging away underneath it. |
||
== Wand editing == |
== Wand editing == |
||
Wand editing is one of the main game mechanics of Noita, changing which [[spells]] and orderings are used in each wand. Wands can normally only be edited while inside the [[Holy Mountain]]. |
Wand editing is one of the main game mechanics of Noita, changing which [[spells]] and orderings are used in each wand. Wands can normally only be edited while inside the [[Holy Mountain]]. |
||
| + | {{spoiler |
||
| − | + | | content = Wands can be edited elsewhere using the [[Perks#Tinker with Wands Everywhere|Tinker with Wands Everywhere]] perk, or while holding the [[Sauvan Ydin]] item. |
|
| + | | warning = This content includes possible gameplay spoilers or secrets. Tread carefully. |
||
| + | }} |
||
| + | |||
| ⚫ | |||
| + | |||
| ⚫ | |||
| + | |||
| ⚫ | |||
| + | |||
| ⚫ | |||
| + | *'''Length''': Longer wands usually have a larger [[#Capacity|Capacity]] and short wands usually have only a few spell slots. |
||
| + | *'''Width''': Wider wands usually have a higher cast delay. |
||
| + | *'''Tip(s)''': Wands that have multiple tips will have a [[#Spells/Cast|Spells/Cast]] equal to or greater than the number of tips. However some single-tipped wands can be multicasts as well. |
||
| + | *'''Glow''': Wands with any spells that are [[#Always Casts|Always Casts]] have a slight purple glow. If there are too many Always Casting wands close together (such as in a wand shop) only one of them will show this glow. |
||
| + | |||
| + | The other two wand properties to affect appearance are recharge time and spread, however there is no clear pattern as to how they affect wand appearance, and can often vary greatly without affecting appearance at all. |
||
| + | |||
| + | |||
| + | |||
| + | Below are some examples:<gallery> |
||
| ⚫ | |||
| ⚫ | |||
| ⚫ | |||
| ⚫ | |||
| ⚫ | |||
| − | == |
+ | ==Wand Statistics== |
| − | === |
+ | ===Shuffle=== |
| − | * |
+ | *Can be Yes or No. |
| − | * |
+ | *If the wand is Shuffle, the wand will go through the spells assigned to it in '''random order''', as if the spells were randomly shuffled on every recharge. |
*Each modifier or multi-cast is treated by a shuffle wand as a valid starting point for combos within a recharge cycle. ex. a Double Cast and two individual spells will result in two single spell casts and a double spell cast, at random, within a single recharge window. Similarly a fire trail and single projectile spell will fire both a fire trail and a regular trail spell within a single recharge cycle. |
*Each modifier or multi-cast is treated by a shuffle wand as a valid starting point for combos within a recharge cycle. ex. a Double Cast and two individual spells will result in two single spell casts and a double spell cast, at random, within a single recharge window. Similarly a fire trail and single projectile spell will fire both a fire trail and a regular trail spell within a single recharge cycle. |
||
| − | * |
+ | *Shuffle wands respect the queue, just not the order within a single recharge cycle. For example a wand with 5 magic missile spells will use one charge from each magic missile spell until it has used one charge from all 5 spells, then it will recharge before randomizing its cast order again and repeating this pattern. |
| − | * |
+ | *If the wand has Formations, Modifiers, Triggers, or Timers, the structure of your custom spell may not work properly due to the nature of '''Shuffle'''. The wand may select a spell ahead of your modifiers, bypassing it completely and casting the basic form of the spell. If it hits a modifier though, it will apply it and move one slot to the right and try again. This repeats until it hits a valid spell. Therefore it's advisable that, if you're using many modifiers, to put your most important modifier to the right of the others. |
| − | * |
+ | *Shuffle wands typically have better stats to compensate for how they restrict and impair spell setup. You can improve consistency by adding multiple copies of the same or similar spell. |
*Shuffle can be useful for rapid-fire low-mana spells, if you have fewer spells available in inventory, or for creating variable distance casting with trigger and timer spells. |
*Shuffle can be useful for rapid-fire low-mana spells, if you have fewer spells available in inventory, or for creating variable distance casting with trigger and timer spells. |
||
| − | *Shuffle is generally considered inferior to No-Shuffle, especially for limited quantity, high mana, and dangerously powerful spells. |
+ | * Shuffle is generally considered inferior to No-Shuffle, especially for limited quantity, high mana, and dangerously powerful spells. |
| − | === Spells/Cast |
+ | === Spells/Cast=== |
* An integer number representing how many different spells are cast every time the player fires the wand. |
* An integer number representing how many different spells are cast every time the player fires the wand. |
||
| − | * |
+ | *It essentially acts as the Burst spell modifiers, as if they are applied before each of your spells. (Spells/Cast will still skip over what has been cast already; you will not fire every possible permutation.) |
| − | * |
+ | *When using a spell with trigger on a wand with 2 or more spells/cast, the trigger will reserve the spells connected to it (for example: a [[Spark Bolt|sparkbolt with trigger]] and a [[Lightning Bolt|lightning bolt]] next to each other. In this case, the wand will consider this combination a single cast). |
| − | === |
+ | ===Cast Delay=== |
| − | * |
+ | *A decimal number, measured in seconds. How long it takes to cast the next spell in the wand queue; a cool down before the next spell in the wand's inventory is cast. |
| − | * |
+ | *Usually shorter than Recharge time; loading multiple identical spells will cast faster if the cast delay is shorter than the Recharge time. |
* Each individual spell in a multi-cast group will be summed together to determine the cast delay. |
* Each individual spell in a multi-cast group will be summed together to determine the cast delay. |
||
| − | * |
+ | *If a group of spells brings the cast delay below 0, the wand will automatically fire the next spell, similar to a multicast. |
| − | * |
+ | *Spells packaged inside a trigger or timer are ignored for calculating cast delay. |
| − | * |
+ | *Cast delay occurs simultaneously with recharge time. At the end of a wand, if the recharge time is low but the cast delay is high, the cast delay will have to be waited out before the wand can be cast again. Similarly, if the cast delay is low and the recharge time is high, the recharge time must be waited out. However, they don't ''add'' to each other; a wand with 0.5s cast delay and 0.5s recharge time will only be waiting 0.5s to recharge, during which the cast delay will also tick down on its own. |
| − | === |
+ | ===Recharge Time=== |
| − | * |
+ | *A decimal number, measured in seconds. When the spell queue reaches the end, the wand must recharge for this long in seconds, refreshing the spell queue. It's like a cool-down effect for the whole wand. |
| − | * |
+ | *Recharge time is cumulatively affected by any spells that add or remove recharge time as they are cast, but the cooldown is only triggered after all spells in the wand have been cast. |
| − | * |
+ | *Hot-swapping the equipped wand does not cancel a recharge once triggered, but it will instantly refresh the spell queue if not recharging. |
| − | * |
+ | *A low recharge time is desirable for ongoing combat, and can be lowered using some spells like chainsaw or luminous drill. |
| − | * |
+ | *A higher recharge time can be used to prevent repeat casting of powerful spells or long duration spells, e.g. [[Bomb]], [[Rain Cloud]]. |
| − | === |
+ | ===Mana max=== |
| − | * |
+ | *An integer. This is how much mana the wand holds when full. The relative current mana of your held wand is shown alongside your other stats in the top right corner of the screen as a blue bar. |
| − | * |
+ | *Spells will consume mana instantly for every single spell and modifier in the cast. If there are [[Trigger]]/[[Timer]] spells, then ''mana is consumed for every spell that '''could''' be fired'' - even if the Trigger condition does '''not''' get fulfilled. If there is insufficient mana for a modifier or connected Trigger spell, the chain will ignore it. |
*If there is insufficient mana for a [[Trigger]]/[[Timer]], but enough mana for a spell connected to that [[Trigger]]/[[Timer]] then connected spell will be casted instead. For example [[Magic Arrow|Magic Arrow with Trigger]] (35 mana) → [[Explosion of Brimstone]] (10 mana) will result in second spell being casted right where you stand if mana drops below 35 and wand's mana recharge rate can't keep up with fire rate. |
*If there is insufficient mana for a [[Trigger]]/[[Timer]], but enough mana for a spell connected to that [[Trigger]]/[[Timer]] then connected spell will be casted instead. For example [[Magic Arrow|Magic Arrow with Trigger]] (35 mana) → [[Explosion of Brimstone]] (10 mana) will result in second spell being casted right where you stand if mana drops below 35 and wand's mana recharge rate can't keep up with fire rate. |
||
*Spells, or even just spell modifiers, might fail to be linked to the cast if there isn't enough mana. For example, if you have a [[Freeze Charge]] modifier that costs 10 mana and a [[Chainsaw]] spell costing 0 mana, you will always be able to cast the [[Chainsaw]], but [[Freeze Charge]] will only apply to it when there is enough mana. |
*Spells, or even just spell modifiers, might fail to be linked to the cast if there isn't enough mana. For example, if you have a [[Freeze Charge]] modifier that costs 10 mana and a [[Chainsaw]] spell costing 0 mana, you will always be able to cast the [[Chainsaw]], but [[Freeze Charge]] will only apply to it when there is enough mana. |
||
* A high mana max is useful for wands that have many modifiers and/or heavy-duty spells. |
* A high mana max is useful for wands that have many modifiers and/or heavy-duty spells. |
||
| − | * |
+ | *A low mana max may be unable to cast even a single spell, eg. A wand in the [[Mines]] that spawns with [[Black Hole]], but not enough max mana, rendering the wand and the spells it contains useless until it can be modified in the [[Holy Mountain]]. |
| − | === |
+ | ===Mana charge speed=== |
| − | * |
+ | *A flat number representing how much mana is regenerated per second. |
*Mana will still recharge when the wand is not held in the hand, unlike the Recharge time. |
*Mana will still recharge when the wand is not held in the hand, unlike the Recharge time. |
||
| − | * |
+ | *A high mana charge speed is desirable for constant combat. |
| − | * |
+ | *A low mana charge speed can still be useful for spells not used often, eg. [[Bomb]], [[Rain Cloud]]. |
*[[Increase Mana]] can be used to alleviate a low Mana Charge speed. |
*[[Increase Mana]] can be used to alleviate a low Mana Charge speed. |
||
| − | === |
+ | ===Capacity=== |
| − | * |
+ | *A flat number that determines how many slots are available to insert spells and modifiers into. |
| − | * |
+ | *A no-shuffle wand will cast spells from left to right. This can be imagined as a queue. A shuffle wand casts its spells in a random order before recharging. |
| − | * |
+ | *Related to the recharge time. The more spells there are to cast, even if it is the same copy, the longer it takes before the wand reaches the end of the spell queue and must recharge. |
| − | === |
+ | ===Spread=== |
| + | [[File:Wand spread.png|right|200px]] |
||
| ⚫ | |||
| ⚫ | |||
| ⚫ | |||
| ⚫ | |||
| ⚫ | |||
| ⚫ | |||
| ⚫ | |||
| ⚫ | |||
| ⚫ | |||
| ⚫ | |||
| ⚫ | |||
| ⚫ | |||
| ⚫ | |||
| − | |||
| ⚫ | |||
* The mana drain of the spell is ignored, as are limited uses (if any), but the cast delay and recharge time modifiers ''will'' be applied. |
* The mana drain of the spell is ignored, as are limited uses (if any), but the cast delay and recharge time modifiers ''will'' be applied. |
||
| − | * |
+ | *The effect is chosen once the wand is randomly generated. It cannot be changed by the player. |
| − | * |
+ | *May be difficult to rediscover what it casts. If you forgot the spell's description, know that you can drag and drop your wands out of your hand and onto the floor, letting you pick the wand up again and see its full description. You may also read the descriptions of your already picked up wands on this screen, so attempting to pick up other wands also works. Another option could be going to the Progress entry in the pause menu and finding the spell's icon among discovered spells. |
| + | *Always Cast spells with Timer or Trigger variations applied will never activate their trigger/timer function. |
||
| + | ===Velocity Multiplier=== |
||
| ⚫ | |||
| + | *A hidden stat changing the velocity of projectiles cast by the wand. |
||
| ⚫ | |||
| + | *Set to 1 for most wands. |
||
| ⚫ | |||
| ⚫ | |||
| − | *'''Tip''': Wands that have multiple ends (looking like a trident) are likely to cast multiple spells at once. |
||
| − | *'''Length''': Wand slot amounts are at least somewhat related to the size of the wand model, larger looking wands usually have many slots and tiny wands usually have only a few. |
||
| ⚫ | |||
| − | *'''Glow''': Wands with an Always Cast have a slight purple glow. |
||
| − | <gallery> |
||
| ⚫ | |||
| ⚫ | |||
| ⚫ | |||
| ⚫ | |||
| ⚫ | |||
| ⚫ | |||
| ⚫ | |||
| − | {{beta}} |
||
| ⚫ | |||
| − | {{Spoiler |
+ | {{Spoiler |
| − | <gallery> |
+ | | content = <gallery> |
| − | Wand experimental wand 2.png|'''Experimental Wand''' <br> Source: [[Lake#Abandoned_Hut|Lake]] <br> Has: [[Glimmer]]s |
||
| − | Wand experimental wand 1.png|'''Experimental Wand''' <br> Source: [[Lake#Abandoned_Hut|Lake]] <br> Has: [[Requirement]]s |
||
Wand flute.png|'''[[Huilu]]''' |
Wand flute.png|'''[[Huilu]]''' |
||
Wand kantele.png|'''[[Kantele]]''' |
Wand kantele.png|'''[[Kantele]]''' |
||
| − | Wand |
+ | Wand vasta.png|'''Vasta''' <br/> Source: [[Hiisi_Base#Points_of_Interest|Hiisi Sauna]] <br/> <abbr title="Always cast">AC</abbr>: [[Water Trail]] |
| − | Wand |
+ | Wand vihta.png|'''Vihta''' <br/> Source: [[Hiisi_Base#Points_of_Interest|Hiisi Sauna]] <br/> <abbr title="Always cast">AC</abbr>: [[Explosion On Drunk Enemies|Expl. on Drunk]] |
| + | Wand wand good 1.png|'''Wand of Swiftness''' <br/> Source: [[The_Tower#Reward_Diamond|The Tower]] <br/> ([[:File:Wand wand of swiftness.png|example]]) |
||
| ⚫ | |||
| − | Wand |
+ | Wand wand good 2.png|'''Wand of Destruction''' <br/> Source: [[The_Tower#Reward_Diamond|The Tower]] <br/> <abbr title="Always cast">AC</abbr>: [[Nuke]] <br/> ([[:File:Wand wand of destruction.png|example]]) |
| − | Wand |
+ | Wand wand good 3.png|'''Wand of Multitudes''' <br/> Source: [[The_Tower#Reward_Diamond|The Tower]] <br/> Has: 26 Multicast <br/> ([[:File:Wand wand of multitudes.png|example]]) |
| − | Wand |
+ | Wand experimental wand 2.png|'''Experimental Wand''' <br/> Source: [[Lake#Abandoned_Hut|Lake]] <br/> Has: [[Glimmer]]s |
| − | Wand |
+ | Wand experimental wand 1.png|'''Experimental Wand''' <br/> Source: [[Lake#Abandoned_Hut|Lake]] <br/> Has: [[Requirement]]s |
| + | Actual wand honest.png|'''Experimental Wand''' <br/> Source: [[Power Plant]] <br/> <abbr title="Always cast">AC</abbr>: [[??? (spell)|???]] <ref>Has very high mana and charge speed, low cast delay and recharge time, along with a [[??? (spell)|???]] as an always cast. The ??? is a special bullet spell that fires a small but fast yellow projectile. It also leaves behind a brass casing after every shot, which can quickly create a large pile.</ref> <br/> ([[:File:Experimental wand3.png|Example]], [[:File:Experimental wand3 in-use.gif|In-use]]) |
||
| + | Wand wood 01.png|'''Kiekurakeppi''' <br/> Source: [[Coal_Pits#Capsule_Puzzle|Coal Pits puzzle]] <br/> <abbr title="Always cast">AC</abbr>: [[Knockback]] |
||
| + | Wand plant 01.png|'''Ruusu''' <br/> Source: [[Mines#Empty Basin, Empty Potion Puzzle|Mines puzzle]] <br/> ([[:File:Ruusu Stats.png|Example]]) |
||
| ⚫ | |||
| + | Wand skull 01.png|Arpaluu <br/> Source: [[The Vault#Puzzles|The Vault puzzle]] (30% chance) <br/> <abbr title="Always cast">AC</abbr>: [[Remove Explosion]] |
||
| + | Wand plant 02.png|Varpuluuta <br/> Source: [[The Vault#Puzzles|The Vault puzzle]] (70% chance) <br/> Passive: removes stains from terrain. |
||
</gallery> |
</gallery> |
||
}} |
}} |
||
| − | == |
+ | ==Trivia== |
| + | |||
| − | * |
+ | *Pedestals holding wands can occasionally be found in custom-designed rooms, often containing [[traps]]. These pedestals are made of [[Materials|Glowing Stone]] that is impervious to most explosions and spells. |
| − | * |
+ | *Wands on the ground will rotate around the handle's tip, though sometimes they won't rotate if an enemy has picked it up before. Non-rotating wands will be in the same pose a creature last put it in. |
*Wands on the ground can be kicked for a very, very slight shift. |
*Wands on the ground can be kicked for a very, very slight shift. |
||
*Wands that contain a electricity spell or modifier (I.e [[Lightning Bolt]], [[Thunder Charge]], [[Electric Arc]], etc) that are held and submerged in a liquid will cause electric particles coming off the wand to intensify and then send out continuous electric shocks after ~3 seconds which will only stop when the wand is pulled out, put away or dropped. |
*Wands that contain a electricity spell or modifier (I.e [[Lightning Bolt]], [[Thunder Charge]], [[Electric Arc]], etc) that are held and submerged in a liquid will cause electric particles coming off the wand to intensify and then send out continuous electric shocks after ~3 seconds which will only stop when the wand is pulled out, put away or dropped. |
||
| − | == |
+ | ==See Also== |
| − | * |
+ | *[[Guide To Wand Mechanics]] |
| + | == Notes == |
||
[[Category:Wands]] |
[[Category:Wands]] |
||
[[Category:Treasure]] |
[[Category:Treasure]] |
||
| Line 149: | Line 174: | ||
[[ja:ワンド]] |
[[ja:ワンド]] |
||
[[zh:Wands/zh]] |
[[zh:Wands/zh]] |
||
| + | |||
| + | <references /> |
||
Revision as of 20:50, 3 October 2021
Wands are your primary tool of combat and utility in Noita. They take up the first four spots of your inventory bar, and can have many different uses and powers depending on the Spells that are in them.
While exploring through the caves in Noita, you can come across new wands on pedestals spread throughout the map, akin to those which can hold potions. Unclaimed wands create a sizeable shining light effect to make them easy to see, even through the unexplored darkness known as the Fog of War, which goes away once the wand has been picked up. Unclaimed Items also shine in the dark, but much more dimly.
Wand examples
Starting Wands
When you start in New Game mode in Noita, you are given two wands. As of version 1.0, the wands are the same but have a random selection from a small pool of spells, as well as some slight variance in their stats.
The Daily Run game mode may change the contents of either of both wands; such as turning the bomb wand into a Fireball wand. You will also be given different loadouts if you start with the official class mod enabled.
Strategies & Tips
- Wand-ordering: Remember to swap the positions of your wands around by dragging and dropping. Place wands in predictable spots on your hotbar to allow for quick use.
- E.g. You might always keep your: Primary damage in position #1, teleport in #2, digging in #3, and storage in #4.
- Spare slot(s): Whilst exploring, you will likely find new wands you want to grab. Try to keep an empty slot or more.
- Mana drain: While tempting, it is usually not desirable (especially with Shuffle wands) to completely fill a wand with spells. Each spell and modifier costs mana, and the stacking mana costs can cause a decent combat wand to become useless in extended fights.
- Pausing the game: When you click to pick up a wand it completely pauses the game, unlike looking at the Inventory screen. Pausing can give you some time to think.
- You can throw a wand currently in your inventory onto the ground by drag-and-dropping it out of the inventory menu, throwing it nearer or further depending on where your target-reticle is.
- Some types of enemies may pick up and use wands.[1] This can be very dangerous, or destructive, or useful - either to yourself or the enemy. For example:
- If an enemy cannot cast the wand (due to it not having spells, or not having a high enough mana max, or containing only something like All Seeing Eye), then it is possible for the enemy to stand around and fire nothing. However, they may still use their normal attacks even while holding a wand (usable or not).
- Some enemies have reflection abilities or shields, but can still hurt themselves. You might throw a wand with an Earthquake on it (and then run away!).
- Charmed Wands: Wands dropped in a pool of Pheromone will cause them to come to life and start following the player as long as they are stained with the liquid. However, these charmed wands will disappear after a few minutes, so it is advised to only apply this strategy when a wand is no longer needed, but more firepower is. Note: The wand's entire hitbox must be covered, which might require throwing it into a slightly deeper pool, or digging away underneath it.
Wand editing
Wand editing is one of the main game mechanics of Noita, changing which spells and orderings are used in each wand. Wands can normally only be edited while inside the Holy Mountain.
This content includes possible gameplay spoilers or secrets. Tread carefully.
Wands can be edited elsewhere using the Tinker with Wands Everywhere perk, or while holding the Sauvan Ydin item.
Click to show/hide content.
Wands can be edited elsewhere using the Tinker with Wands Everywhere perk, or while holding the Sauvan Ydin item.
Wands can be edited elsewhere using the Tinker with Wands Everywhere perk, or while holding the Sauvan Ydin item.
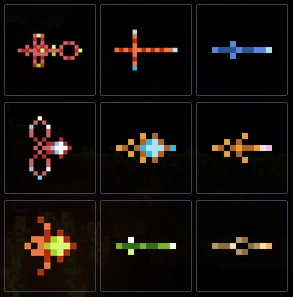
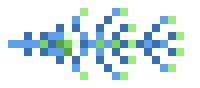
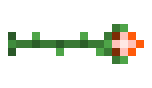
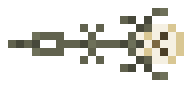
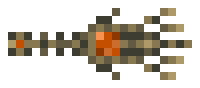
Wand appearance
Wand appearances are usually procedurally-selected.[2] Similar designs may appear between runs, due to containing the same general spells and/or stats. This is primarily seen in the earliest biomes.
There are a few identifiable relationships between a wand's design and its statistics:
- Gemstone: Non-Shuffle wands have a rhombic core (gemstone) in them.
- Length: Longer wands usually have a larger Capacity and short wands usually have only a few spell slots.
- Width: Wider wands usually have a higher cast delay.
- Tip(s): Wands that have multiple tips will have a Spells/Cast equal to or greater than the number of tips. However some single-tipped wands can be multicasts as well.
- Glow: Wands with any spells that are Always Casts have a slight purple glow. If there are too many Always Casting wands close together (such as in a wand shop) only one of them will show this glow.
The other two wand properties to affect appearance are recharge time and spread, however there is no clear pattern as to how they affect wand appearance, and can often vary greatly without affecting appearance at all.
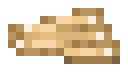
Below are some examples:
No-shuffle

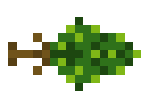
Multicast

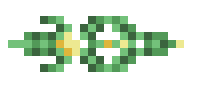
Large capacity

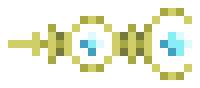
Small capacity


Wand Statistics
Shuffle
- Can be Yes or No.
- If the wand is Shuffle, the wand will go through the spells assigned to it in random order, as if the spells were randomly shuffled on every recharge.
- Each modifier or multi-cast is treated by a shuffle wand as a valid starting point for combos within a recharge cycle. ex. a Double Cast and two individual spells will result in two single spell casts and a double spell cast, at random, within a single recharge window. Similarly a fire trail and single projectile spell will fire both a fire trail and a regular trail spell within a single recharge cycle.
- Shuffle wands respect the queue, just not the order within a single recharge cycle. For example a wand with 5 magic missile spells will use one charge from each magic missile spell until it has used one charge from all 5 spells, then it will recharge before randomizing its cast order again and repeating this pattern.
- If the wand has Formations, Modifiers, Triggers, or Timers, the structure of your custom spell may not work properly due to the nature of Shuffle. The wand may select a spell ahead of your modifiers, bypassing it completely and casting the basic form of the spell. If it hits a modifier though, it will apply it and move one slot to the right and try again. This repeats until it hits a valid spell. Therefore it's advisable that, if you're using many modifiers, to put your most important modifier to the right of the others.
- Shuffle wands typically have better stats to compensate for how they restrict and impair spell setup. You can improve consistency by adding multiple copies of the same or similar spell.
- Shuffle can be useful for rapid-fire low-mana spells, if you have fewer spells available in inventory, or for creating variable distance casting with trigger and timer spells.
- Shuffle is generally considered inferior to No-Shuffle, especially for limited quantity, high mana, and dangerously powerful spells.
Spells/Cast
- An integer number representing how many different spells are cast every time the player fires the wand.
- It essentially acts as the Burst spell modifiers, as if they are applied before each of your spells. (Spells/Cast will still skip over what has been cast already; you will not fire every possible permutation.)
- When using a spell with trigger on a wand with 2 or more spells/cast, the trigger will reserve the spells connected to it (for example: a sparkbolt with trigger and a lightning bolt next to each other. In this case, the wand will consider this combination a single cast).
Cast Delay
- A decimal number, measured in seconds. How long it takes to cast the next spell in the wand queue; a cool down before the next spell in the wand's inventory is cast.
- Usually shorter than Recharge time; loading multiple identical spells will cast faster if the cast delay is shorter than the Recharge time.
- Each individual spell in a multi-cast group will be summed together to determine the cast delay.
- If a group of spells brings the cast delay below 0, the wand will automatically fire the next spell, similar to a multicast.
- Spells packaged inside a trigger or timer are ignored for calculating cast delay.
- Cast delay occurs simultaneously with recharge time. At the end of a wand, if the recharge time is low but the cast delay is high, the cast delay will have to be waited out before the wand can be cast again. Similarly, if the cast delay is low and the recharge time is high, the recharge time must be waited out. However, they don't add to each other; a wand with 0.5s cast delay and 0.5s recharge time will only be waiting 0.5s to recharge, during which the cast delay will also tick down on its own.
Recharge Time
- A decimal number, measured in seconds. When the spell queue reaches the end, the wand must recharge for this long in seconds, refreshing the spell queue. It's like a cool-down effect for the whole wand.
- Recharge time is cumulatively affected by any spells that add or remove recharge time as they are cast, but the cooldown is only triggered after all spells in the wand have been cast.
- Hot-swapping the equipped wand does not cancel a recharge once triggered, but it will instantly refresh the spell queue if not recharging.
- A low recharge time is desirable for ongoing combat, and can be lowered using some spells like chainsaw or luminous drill.
- A higher recharge time can be used to prevent repeat casting of powerful spells or long duration spells, e.g. Bomb, Rain Cloud.
Mana max
- An integer. This is how much mana the wand holds when full. The relative current mana of your held wand is shown alongside your other stats in the top right corner of the screen as a blue bar.
- Spells will consume mana instantly for every single spell and modifier in the cast. If there are Trigger/Timer spells, then mana is consumed for every spell that could be fired - even if the Trigger condition does not get fulfilled. If there is insufficient mana for a modifier or connected Trigger spell, the chain will ignore it.
- If there is insufficient mana for a Trigger/Timer, but enough mana for a spell connected to that Trigger/Timer then connected spell will be casted instead. For example Magic Arrow with Trigger (35 mana) → Explosion of Brimstone (10 mana) will result in second spell being casted right where you stand if mana drops below 35 and wand's mana recharge rate can't keep up with fire rate.
- Spells, or even just spell modifiers, might fail to be linked to the cast if there isn't enough mana. For example, if you have a Freeze Charge modifier that costs 10 mana and a Chainsaw spell costing 0 mana, you will always be able to cast the Chainsaw, but Freeze Charge will only apply to it when there is enough mana.
- A high mana max is useful for wands that have many modifiers and/or heavy-duty spells.
- A low mana max may be unable to cast even a single spell, eg. A wand in the Mines that spawns with Black Hole, but not enough max mana, rendering the wand and the spells it contains useless until it can be modified in the Holy Mountain.
Mana charge speed
- A flat number representing how much mana is regenerated per second.
- Mana will still recharge when the wand is not held in the hand, unlike the Recharge time.
- A high mana charge speed is desirable for constant combat.
- A low mana charge speed can still be useful for spells not used often, eg. Bomb, Rain Cloud.
- Increase Mana can be used to alleviate a low Mana Charge speed.
Capacity
- A flat number that determines how many slots are available to insert spells and modifiers into.
- A no-shuffle wand will cast spells from left to right. This can be imagined as a queue. A shuffle wand casts its spells in a random order before recharging.
- Related to the recharge time. The more spells there are to cast, even if it is the same copy, the longer it takes before the wand reaches the end of the spell queue and must recharge.
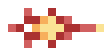
Spread
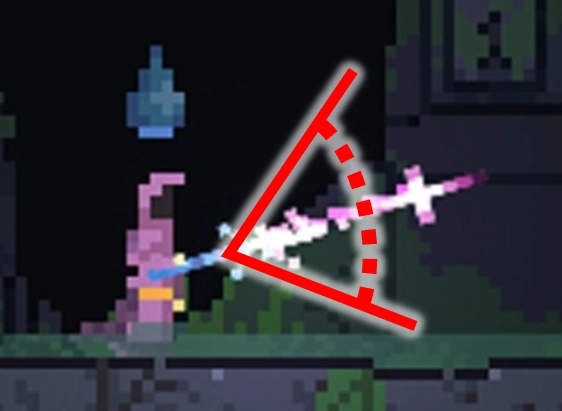
- A decimal number that represents the potential random spread of your spell's projectiles, as measured in degrees. This is your cone of fire.
- A positive spread value causes inaccuracy. Negative spread does not result in inaccuracy. It simply helps mitigate (positive) increased spread.
- The final spread is calculated by adding together the wand's spread and the spell's spread with modifiers added.
- Therefore, a wand with negative spread can counteract a spell with positive spread, or vice versa.
- Positive spread values can also be mitigated by the Homing perk and modifiers Homing and Reduce Spread. These are not always reliable if you are using Formation modifiers, however.
Always Casts
- Often highly desirable. Every spell emitted from the wand's first cast itself will have the Always Casts spell or modifier added on, BUT, the Always Casts bonus does not apply to secondary/tertiary casts from Trigger/Timer spells being fired.
- The mana drain of the spell is ignored, as are limited uses (if any), but the cast delay and recharge time modifiers will be applied.
- The effect is chosen once the wand is randomly generated. It cannot be changed by the player.
- May be difficult to rediscover what it casts. If you forgot the spell's description, know that you can drag and drop your wands out of your hand and onto the floor, letting you pick the wand up again and see its full description. You may also read the descriptions of your already picked up wands on this screen, so attempting to pick up other wands also works. Another option could be going to the Progress entry in the pause menu and finding the spell's icon among discovered spells.
- Always Cast spells with Timer or Trigger variations applied will never activate their trigger/timer function.
Velocity Multiplier
- A hidden stat changing the velocity of projectiles cast by the wand.
- Set to 1 for most wands.
Unique wands
There are also some unique named wands, which can be obtained from secret locations or solving puzzles.
This content includes possible spoilers or secrets. Tread carefully.
Vasta
Source: Hiisi Sauna
AC: Water TrailVihta
Source: Hiisi Sauna
AC: Expl. on DrunkExperimental Wand
Source: Lake
Has: RequirementsExperimental Wand
Source: Power Plant
AC: ??? [3]
(Example, In-use)Kiekurakeppi
Source: Coal Pits puzzle
AC: KnockbackRuusu
Source: Mines puzzle
(Example)Valtikka
Source: Snowy Depths puzzle
AC: Piercing ShotArpaluu
Source: The Vault puzzle (30% chance)
AC: Remove ExplosionVarpuluuta
Source: The Vault puzzle (70% chance)
Passive: removes stains from terrain.


![Experimental Wand Source: Power Plant AC: ??? [3] (Example, In-use)](https://static.wikia.nocookie.net/noita_gamepedia_en/images/0/00/Actual_wand_honest.png/revision/latest?cb=20210327013328)


Click to show/hide content.
Vasta
Source: Hiisi Sauna
AC: Water TrailVihta
Source: Hiisi Sauna
AC: Expl. on DrunkExperimental Wand
Source: Lake
Has: RequirementsExperimental Wand
Source: Power Plant
AC: ??? [3]
(Example, In-use)Kiekurakeppi
Source: Coal Pits puzzle
AC: KnockbackRuusu
Source: Mines puzzle
(Example)Valtikka
Source: Snowy Depths puzzle
AC: Piercing ShotArpaluu
Source: The Vault puzzle (30% chance)
AC: Remove ExplosionVarpuluuta
Source: The Vault puzzle (70% chance)
Passive: removes stains from terrain.
Trivia
- Pedestals holding wands can occasionally be found in custom-designed rooms, often containing traps. These pedestals are made of Glowing Stone that is impervious to most explosions and spells.
- Wands on the ground will rotate around the handle's tip, though sometimes they won't rotate if an enemy has picked it up before. Non-rotating wands will be in the same pose a creature last put it in.
- Wands on the ground can be kicked for a very, very slight shift.
- Wands that contain a electricity spell or modifier (I.e Lightning Bolt, Thunder Charge, Electric Arc, etc) that are held and submerged in a liquid will cause electric particles coming off the wand to intensify and then send out continuous electric shocks after ~3 seconds which will only stop when the wand is pulled out, put away or dropped.
See Also
Notes
- ↑ Generally the Hiisi, Mages, and Robots
- ↑ Except for the #Unique wands
- ↑ Has very high mana and charge speed, low cast delay and recharge time, along with a ??? as an always cast. The ??? is a special bullet spell that fires a small but fast yellow projectile. It also leaves behind a brass casing after every shot, which can quickly create a large pile.