Breezebuilder (talk | contribs) (Updated and corrected glyph translation key images) Tag: Source edit |
(→Notes) Tag: Visual edit |
||
| (One intermediate revision by one other user not shown) | |||
| Line 420: | Line 420: | ||
It also spawns a portal to the Portal Room upon death. Attempting to enter the Portal Room through means other than this portal causes the Portals in the room to despawn, though it is unknown if Syväolento has anything to do with this or not. |
It also spawns a portal to the Portal Room upon death. Attempting to enter the Portal Room through means other than this portal causes the Portals in the room to despawn, though it is unknown if Syväolento has anything to do with this or not. |
||
| + | |||
| + | === Mestarien mestari === |
||
| + | [[Mestarien mestari]], or the Grand Master, is a being encountered in the Throne Room east of the Wizard's Den. It dons a helmet covering its face, and a purple cloak with three images of eyes pictured upon it. Upon Mestarien mestari entering its third phase, the helmet is seemingly destroyed, revealing a writhing mass of flesh beneath. The Grand Master is capable of using several different magical attacks, and is able to summon Mestari enemies to its aid. It is additionally able to attack using blood tentacles. |
||
| + | |||
| + | Due to its name, the name of its arena and the area preceding it, its extreme magical abilities, and ability to summon Mestari enemies, it can be reasoned that the Mestarien mestari may likely be or have been some sort of leader of the Mestari. |
||
== Items == |
== Items == |
||
| Line 464: | Line 469: | ||
== Notes == |
== Notes == |
||
| − | * [https://www.reddit.com/r/noita/comments/dh7pcb/this_appeared_in_the_orb_room_past_lava_lake_when/ Reddit post about the Orb Room across the Lava Lake] |
||
* [https://www.youtube.com/watch?v=vqmOnScq75Y Explanatory video] by FuryForged |
* [https://www.youtube.com/watch?v=vqmOnScq75Y Explanatory video] by FuryForged |
||
Revision as of 01:59, 15 May 2022
This page contains major spoilers surrounding the lore of the game.
Creation Lore (Orb Room Glyphs)
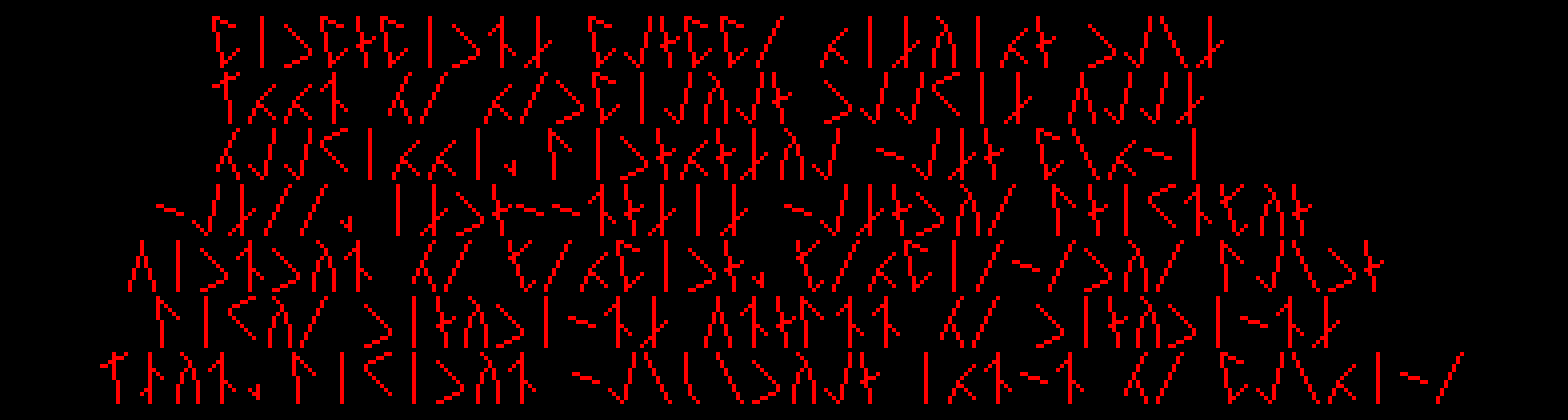
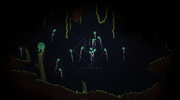
Scattered throughout the world in Orb Rooms, the story of Noita can be translated and pieced together from a series of glyphs, which can be uncovered by pouring various substances in various orders into the various basins of water found in the aforementioned Orb Rooms.
The glowing red glyphs that are revealed are a Finnish cipher-text.
The story is also told in pictographs, in the starry cutscene presented when a player boots up the game for the very first time.
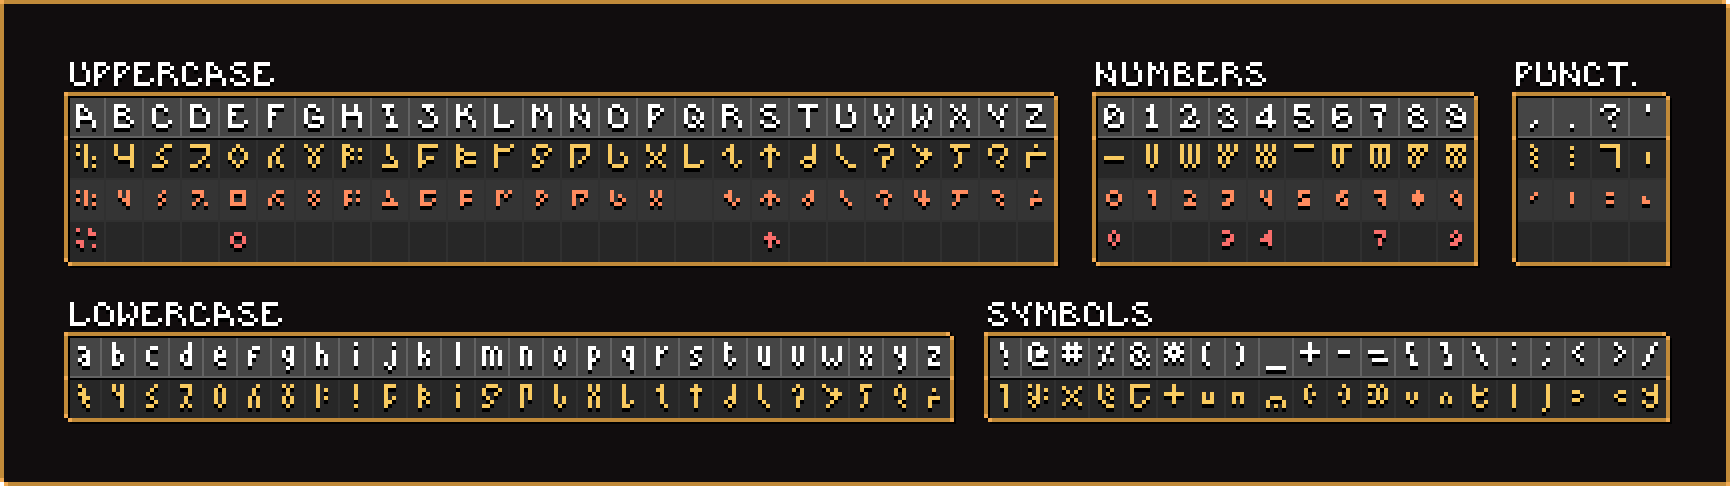
Cipher Key
The orb room glyphs can be translated using this key to map each glyph to a Finnish character.

Translation
Below is a table containing the original glyphs, the deciphered Finnish, and an English translation.
| Glyphs | Finnish | English Translation |
|---|---|---|
|
Keskikesän kuikka lenteli suon yllä ja laskeutui suuren puun juurelle. Vesilintu muni kolme munaa. Ensimmäinen munista vierähti pesästä ja halkesi. Halkeamasta vuosi verta seitsemän päivää ja seitsemän yötä. Verestä muodostui elämä ja kuolema |
The midsummer's loon flew over a swamp |

|
Valkuainen valui länteen ja siitä muodostui kylmyys ja jää. Kuoresta muodostuivat maat ja vuoret |
The egg white flowed west, forming the cold and the ice. |
Keltuainen valui itään ja siitä muodostui lämpö ja tuli |
The yolk flowed east, becoming heat and flame. | |

|
Viimein munasta kuoriutui Luonto. Luonto loi lait luonnon, asetti eläimet, niityt, joet, kummut ja vuoret |
Finally, the egg hatched, and from it came Nature. |

|
X yötä ja X päivää vierähti X kertaa. Luonto puuhasteli itsekseen. Luonto katseli tekojaan ja oli tyytyväinen luomuksiinsa. Maailmassa oli harmonia |
X days and X nights passed X times[1][2]. Nature worked by itself. It |

|
Toinen munista kuoriutui ja sieltä syntyi Taikuus. Taikuus katseli Luonnon luomuksia ja antoi niille sielun. Ei pelkästään eläimille, vaan myös aineille |
The second egg hatched, and from it Magic was born. |

|
Sielun paino jalosti ja kieroutti luonnon luomuksia. Kullan jalous antoi sille hohdon. Mudan saamattomuus antoi sille pistävän hajun |
The burden of the soul refined and twisted the creations |

|
Taikuus rikkoi luonnon lakeja. Luonto ja Taikuus alkoivat riidellä siitä miten maailman kuuluisi olla |
Magic broke the laws of nature. Nature and Magic began |

|
Munista viimeinen kuoriutui ja sieltä syntyi teknologia. Teknologia antoi luonnon eläimille kyvyn käyttää koneita ja laitteita |
The last egg hatched, and from it Technology was born. |
For more information regarding accessing the glyphs which tell the story above, see this video.
Explanation
In short, the glyphs tell the story of the creation of Noita's world, and the birth of the gods of Nature, Magic, and Technology. The midsummer's loon (possibly some sort of creator bird) laid three eggs. The first egg fell out of the nest the three eggs were lain in, and cracked. This egg then bled for 7 days and nights, and from this life and death were formed.
The white of the egg flowed out to the west, forming the Snowy Wasteland, along with the earth and the mountains. Next, the yolk of the egg flowed out to the east, creating the Desert and bringing heat and fire to the world. The egg then hatched, and the god of Nature was born. Nature then created the laws of nature, the plants and animals, and 'set' the earth, mountains, rivers, etc. in place. An unknown amount of time passed as the god of Nature worked. The god of Nature is noted as being satisfied with its creations, and that there was harmony in the world.
The second egg then hatched, and the god of Magic was born. When the god of Magic looked upon the god of Nature's creations, it decided to give them a soul; it is unknown whether this was done out of admiration for the god of Nature's work, dissatisfaction with the god of Nature's work, or some other reason. The god of Magic gave a soul to both the plants and animals, and to the materials as well, which was possibly the source of the Alchemy system. Some materials were made better by being given a soul, such as gold, while some were made worse, such as mud. This action seemingly upset the god of Nature, and is possibly what is referred to by the god of Magic 'breaking the laws of nature'. The two gods then began to argue over how the world should be.
Finally, the third egg hatched, and the god of Technology was born, who then gave the animals of Nature the ability to use machines and devices. It is unknown whether this upset any of the other gods.
Connections with Finnish Mythology
The Loon mentioned in the first glyph, as well as the world and various primordial forces being formed from the cracking or hatching of three eggs, are almost certainly allusions to the Kalevala, in which the world is formed when a Pochard makes a nest on the knee of the sky goddess Ilmatar, who is laying on her back on an endless ocean. Ilmatar shakes her leg, causing three eggs to fall into the ocean and break, forming the world. A similar event forms the world in the folklore on which the Kalevala is based, with some significant differences. Nature has some similar characteristics to Sampsa Pellervoinen, another figure in the Kalevala, who "sows" all vegetation and even the very landscape, though he isn't responsible for the creation of animals.
Miscellaneous Glyphs

Comparison of glyph styles, showing a Holy Mountain platform and the monument to Bammalam.
A different set of glyphs, which translate directly into English, can be found in other locations. They can be found adorning various altars, on platforms such as under the Pickups and the Perks within the Holy Mountains, and inscribed into various parts of the world.
They can appear as if styled in different ways, depending on how condensed the font is. Short and compact glyphs appear on platforms and altars, and taller more script-like forms can appear in places such as the Giant Tree's monument to Bammalam.
Emerald Tablets and Books are also written with these glyphs, although they will be automatically translated for the player if they stop to read them.
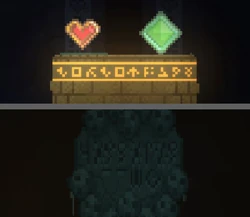
Note: Alchemical symbols in-game, such as the ones on the Nullifying Altar, should match up to alchemical symbols from real life.
Key
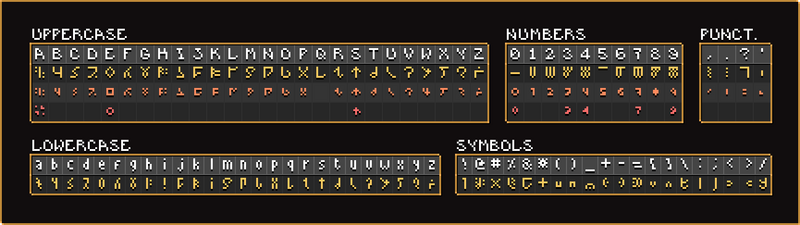
Glyph translation key for the common kinds of glyph found throughout the world.

Infographic map showing the approximate locations of all the secret messages.
Secret Messages
There are also a myriad of hidden messages, often buried deep underneath the ground and entirely hidden until areas have been excavated. These are organised based on the depth at which they can be found in the world.
Note: there are some missing punctuation and grammatical errors in the translations; these reflect missing glyphs or apparent grammatical errors in the original glyphs. These translations are 1:1 for easy comparison to make them good translation examples.

Hiisi Base graffiti saying "HIIDET" (plural of Hiisi)
| Location | Glyphs | Deciphered Text |
|---|---|---|
| Buried beneath the peak of the Mountain in the Forest where you start. | 
|
Devoted seeker after true wisdom
know this  we are watching you.
[1] |
| Underneath the Brickwork of the Holy Mountain at the far right of the Mines. | 
|
Why? Why did you look here? What answers are you trying to find in here? |
| Underneath the Lava Lake east of the Mines, beneath the location of the Orb of True Knowledge. | 
|
We know what you are after. But it is not here, Knower to Be. |
| Below the Orb Room beyond the Magical Temple west of the Snowy Depths | 
|
Why are you doing this? Why are you reading this? What do you think you will find in here? The answer to the treasure? |
| To the East of the Holy Mountain between the Hiisi Base and the Underground Jungle, buried in Extremely Dense Rock. | 
|
Why must you go destroying everything? Why? For glory? For your precious god of gods. Is it really worth all this? Is it? Is it really? |
| In the leftmost section of Holy Mountain brickwork between the Underground Jungle and The Vault. | 
|
What do you worship? You don't even know it. You think you know the answer, but you don't. You think the treasure will satisfy you, but it won't. You don't even know what you're seeking. You think you do, but you don't. |
| West of the Holy Mountain leading into the Temple of the Art, inside the Extremely Dense Rock. | 
|
You gave your free will to the true god. Why else would be here? Why else would be reading this? We wanted you to come here. We wanted you to read this! You think you have free will? We made you come here. We made you read this. |
| Inside the lava pocket above the boss room in The Laboratory, directly above Kolmisilmä. | 
|
Who do you worship? Who is your god? Your real god? you don't even know it. You don't even understand it. You understand so little that we pity you... poor little thing. You've come so far, yet you have so far to go. Or maybe you understand more than we think? You are reading this? Do you even know who your god is? Your true god? The god of gods, the one true god! You think we're the false god, but we created your god and your god of gods. Now who is the real god? If we've created your god and your god of gods and you and your free will and this world and all the worlds. All of it. We allowed you to have free will. Think you have free will. You poor thing. You don't. You think we are the monsters. We're not. Who is the real monster? Your god is, your god of gods is the real monster Your true god is the real monster. |
| Underneath the left side of the boss arena in The Laboratory, inside the Volcanic Lake. | 
|
You come here seeking answers? You think we have all the answers? We don't not. You think we are so different We are the same. We both serve the same god. The god of many gods. The god we've created. You think you're destroying us. You are not. You are helping us. |
| Inside the Extremely Dense Rock southeast of the boss room, directly west of The Work (End). | 
|
You think you can destroy us? You will not destroy us. We gave you your free will. We made this place. And not just this place, all the places, all the dimensions, all the free wills. You think you've come to steal from us? No, we stole from you. We stole your time and your money and your sanity. |
| Very, very deep in the rock beneath the Essence of Water room in The Work (Hell), somewhat near the depth of the first Mines layer in the repeating layers of Hell. | 
|
This is very clever of you. Very clever. We're impressed with you, Knower to Be. |
| Very, very deep in the lava column to the East of The Work (Hell), approximately around the depth of the first or second biome layer in the repeating layers of Hell. | 
|
While we're impressed, we must ask you this
is it really worth transcribing these? Do
you really expect us the reveal the real secret?
We can tell you this  it is possible but
even we don't know how.
[2] |
Magical symbol
A magical symbol, or a portion of it, is shown at various times throughout the game, such as: collapse of the Holy Mountain, spawn of the Suomuhauki, and game endings sequences.
The glyphs around the outer ring says "MGICK" (repeating) and inner-ring say "MAGICK" (repeating). The glyph in the center is unidentified, but resembles the arabic-indic digit three (3): ٣
Friend Room
The Friend Room has the glyphs for "FRIENDHSIP" [sic] on the wall.
Locations and Landmarks
Along with the Orb Rooms, there are several other locations of note within Noita's world.
The Holy Mountains
It is unknown who built the Holy Mountains, and there is no clear group that likely built them. Defiling the Holy Mountains angers 'The Gods' as opposed to a single god, so it is unlikely that a single faction built the Holy Mountains, as no specific faction seems to be devoted to multiple gods, perhaps save for the Alchemists. However, there is no further evidence past this that may indicate that the Alchemists may have built the Holy Mountains, and as such it is unlikely.
Notably, there are several Teleportatium filled eye-like structures embedded in the Holy Mountains, the Teleportatium in them allowing the portals into the Holy Mountains to function. It is unknown what level of expertise with magical liquids is needed to be able to create stable, lasting portals like this using Teleportatium, but due to their rarity(appearing only two other times in the game; once in a rare broken eye-like structure in the Snowy Depths and once in The Hourglass Chamber in the Hiisi Base), it can be inferred that they require an at least decent amount of skill to create.
The Meditation Cube and The Meditation Chamber
The Meditation Cube is a rare structure which can occasionally spawn in the Coal Pits. Standing on the cube for a period of time will cause a portal to the Meditation Chamber to spawn.
The Meditation Chamber appears to be the interior of the Meditation Cube, based upon the glyphs that appear on both being identical (though reversed in the Meditation Chamber, to line up with it being on the interior). The cube and chamber notably greatly differ in their size relative to Minä; which along with them seemingly being the same structure, and the lack of destroyed terrain upon exiting the chamber largely ruling out the cube expanding when the portal is entered, implies that the character is somehow shrunk down when entering the portal into the cube, though how this is achieved is unknown.
Notably, an odd outline of a prism appears around the portal on the inside of the chamber. It is possible, though not confirmed, that this prism outline may somehow be connected to the shrinking effect, as it is seen nowhere else in the game. The player also gains the ability to tinker with wands while they are in the chamber for the first time, so the prism could also be linked to this. Alternatively, it could also be purely aesthetic.
Buried Eye
The Buried Eye is a rare structure that can occasionally spawn in the Snowy Depths. It is identical to the eye structures embedded in Holy Mountains, however, its top has been broken open, and it lacks the Teleportatium customary to the eye structures.
Filling the eye with Teleportatium or Unstable Teleportatium will generate a portal to a closed off snowy cave, housing two wands and a portal to return to the Snowy Depths. It is unknown by who or for what purpose this specific eye was originally made, due to its differing portal destination from the Holy Mountain eyes.
The Robotic Egg
The Robotic Egg is possibly the egg from which the god of Technology hatched. The egg is accessed by using a portal that is summoned via a spell which is dropped after three special Munkki enemy encounters in the Snowy Depths. The location at which the portal spell must be used is then found in the Underground Jungle, determined by the locations of four Munkki statues. The cryptic nature of the statues alongside the spell being possessed by special Munkki enemies may indicate that The Robotic Egg may be considered a location of pilgrimage by the Munkki.
The End of Everything spell is also found within The Robotic Egg, though it is unknown if there is a lore reason for this, or if it is purely for gameplay purposes. The Robotic Egg being submerged in lava may have something to do with the presence of the spell, or the inverse may be true, and it may be possible that the spell's presence is the reason for the egg being submerged. Again though, this is unknown, and it may be purely for gameplay purposes in order to make the spell more difficult to reach.
Hiisi Base
Seemingly the Hiisi's main base of command in the mountain. The Hourglass Chamber is hidden here, though whether it was built by the Hiisi or by another party is unknown. Whether or not this is the Hiisi's main base as a whole is unknown.
The Hourglass Chamber
The Hourglass Chamber is a structure hidden above a shop in the Hiisi Base, which contains a large Hourglass with a small amount of blood at its bottom, and that has a statue of something behind it. It is unknown whether the chamber was built by the Hiisi or someone else, though the Hiisi's lack of expertise in magic may indicate that they were not the chamber's builders. The Hourglass Chamber has three different functions dependent upon what is done with the Hourglass; it either causes an earthquake, turns blood into gold, or opens a portal to an eye shaped room containing 8 spells. Notably, the eye room has an odd purple spiral originating from behind the portal. The Blood-to-Gold transformation may imply Alchemist involvement, though this is entirely speculative.
The Laboratory
The Laboratory is the area in which Kolmisilmä is fought, the location at which the portal to The Work (End) opens upon Kolmisilmä's death, and is the resting place of the Sampo. Oddly, the area does not appear to resemble a typical laboratory, and the reason why it is named The Laboratory is unknown. A large amount of The Laboratory appears to be damaged, based on the large ruins deep in the Volcanic Lake, but it is unknown what the possible cause of this damage is.
The Moon
The Moon is located at the very top of the Cloudscape, and as is said in one of the books in the game (located at the Coral Chest), is the origin of four of the Essences; most likely the Essences of Water, Fire, Earth, and Air. It is possibly the egg of the god of Magic, evidenced by the magical Elements originating from it, and that returning the Essences to it results in it turning into Void Liquid, a magical liquid.
Essence Eaters


The Essence Eaters are structures which spawn in both the Snowy Wasteland and in the Desert. Destroying them will cause any Essences that the player currently has to be crystalized into magical stones. The Essence Eaters are artificial creations, stated in the book at the Coral Chest. Their creator is unknown, however, the way the book is worded may imply that the author may have been an Alchemist. This is, however, still unknown.
Coral Chest, Dark Chest, and Altars


The Coral Chest's resting place.
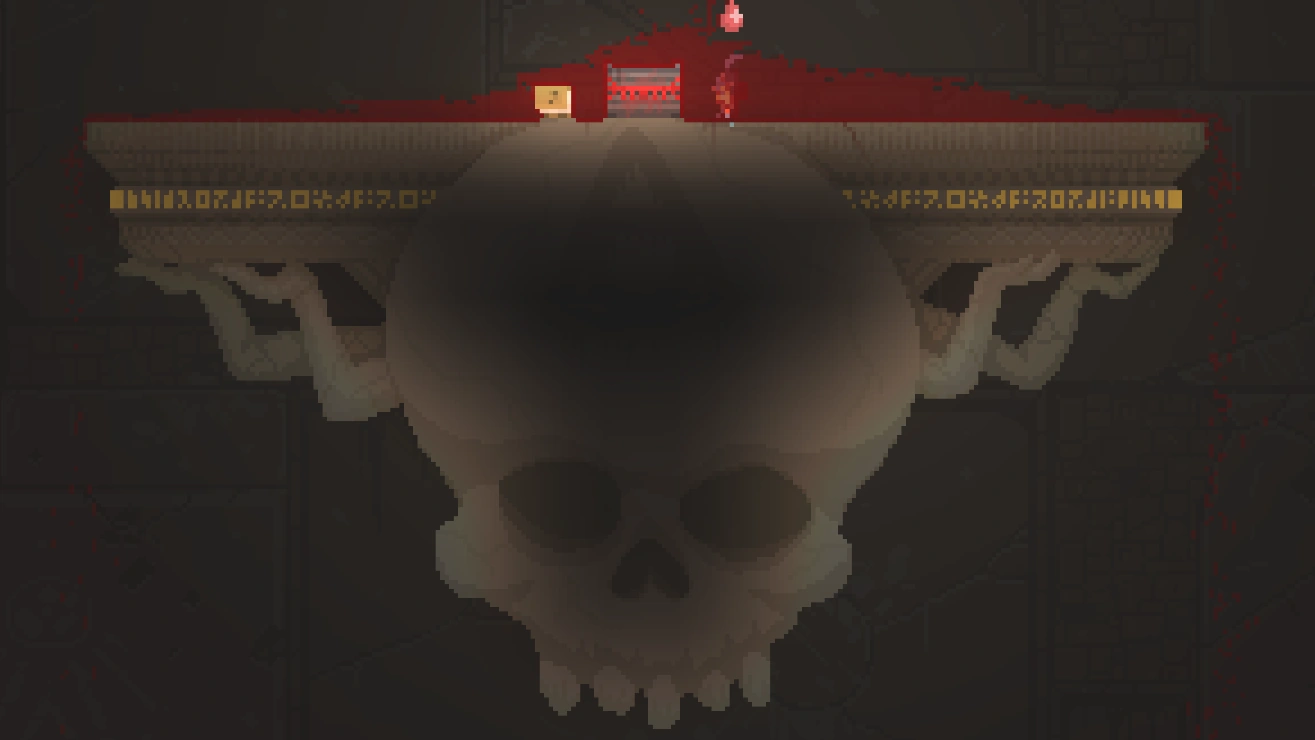

The Dark Chest's resting place.
The Coral Chest and Dark Chest are two objects which can be found in the Cloudscape and deep under the Volcanic Lake respectively. Each chest sits upon a large altar, with the Coral Chest Altar bearing a statue that possesses a striking resemblance to Kolmisilmä, and the Dark Chest Altar bearing a statue that possesses a striking resemblance to a human skull, and possibly to the large skull from which Limatoukka is spawned. The runes on both Altars seem to translate to "Death", repeating.
The Alchemists were aware of at least the Dark Chest's existence, and of how to open it, as is evidenced by the Alchemist's Notebook found in the Overgrown Cavern, which contains the notes required to open the Dark Chest, claiming that "The one below listens to my songs..."
Alchemist's Notebook

"The one below listens to my songs...
G D# G E A
E C B G# F"
Sun and Dark Sun
The Sun and Dark Sun are two celestial bodies that are formed from the Sunseed, dropped by The Forgotten boss. The suns are seemingly heavily tied to the balance of the world. Each variant of Sun requires at least 4 elemental stones, which as they can be formed from the crystallization of the essences, are likely heavily tied to the balance of the world themselves, evidenced by the Tome of Essences. The process by which the suns are made was known by at least one of the Alchemists, who came to fear the alchemical art enough to hide away a guide which had been written on how to create the new suns.
The Giant Tree
The Giant Tree is a structure found to the west of the mountain. The tree is, fitting to its name, extremely large, reaching higher than the peak of the mountain. Midway up the tree is a nest with a/multiple wiggling egg/eggs. This may imply that worms occasionally create nests, though how they would go about doing this is unknown, and the nest may instead simply be an aesthetic choice on the developers, or may be there to keep the egg/eggs from rolling away.
Next to the nest with the wiggling eggs is a small alcove in the tree, within which is a diamond altar on which the Curse of Greed can be found. It is unknown who created this, though whoever did is presumably the same person that created the Diamond of Avarice, due to the structures interacting with each other, and due to the shared building material of the two structures.
At the top of the tree is a Music Machine, several explosive mushrooms, and the achievement pillars. The jagged shape of the tree's top and the lack of leaves and other features may indicate that the tree was extremely heavily damaged at some point, possibly through an explosion of some sort. What could have caused this explosion is unknown. It is also unknown whether the Music Machine, mushrooms, or achievement pillars have any sort of connection with what may have destroyed the tree.
Entities
Minä / Noita
Minä (sometimes referred to as "the Noita") is the player character, and very little is known about their origin, affiliations, etc. Most of the game's creatures are hostile towards him on sight, though whether this is due to some sort of faction affiliation, a territorial reason, or another cause entirely is unknown.
Minä's robe bears a resemblance to those of the alchemist faction, being of similar shape and color. It is unknown if they have any sort of affiliation or connection to the alchemists.
Minä is also the only entity in the game world seen to actively carry wands on their person. While many other entities are capable of carrying wands, and many are capable of casting some spells without wands, Minä is the only one to regularly carry wands for the most part, with few exceptions.
Kolmisilmä
Kolmisilmä's origin is unknown. It does seem to have some sort of connection with the gods, due to its unique interactions with the Moon and Dark Moon when it has been transformed using the Refreshing Gourd, and its close connection with the Sampo. This connection to the gods is further emphasized with the strong resemblance the altar of the Coral Chest has with Kolmisilmä. It is unknown whether this connection is a positive or negative one.
The presence of several murals of Kolmisimä around the Ancient Laboratory and Magical Temples may suggest a possible connection to the Alchemists, as well as the effect that the Orbs of True Knowledge have on Kolmisilmä. It is possible Kolmisilmä may have once been an Alchemist, who at some point ascended or became corrupted through some way.
Sauvojen Tuntija
Sauvojen Tuntija's origins are unknown. It is possible it may have some sort of connection to the Orbs of True Knowledge, as it is spawned when taking a specific orb, though nothing is confirmed. Like Kolmisilmä, Sauvojen Tuntija may also have some sort of connection to the Alchemists, possibly being an ascended or corrupted Alchemist, evidenced by their ability to summon and use wands, and their seeming connection to an Orb of True Knowledge.
Syväolento
Syväolento, also known as the Creature of the Deep or Leviathan, is a seemingly aquatic being found extremely deep in the Lake. It's origin is unknown, but it seemingly has a significant amount of control over water, Fungal Shifting all water into smoke when the creature is killed. This may imply the possibility that there are creatures able to perform Fungal Shifts at will, though the flexibility with which creatures may be able to do this is unknown.
It also spawns a portal to the Portal Room upon death. Attempting to enter the Portal Room through means other than this portal causes the Portals in the room to despawn, though it is unknown if Syväolento has anything to do with this or not.
Mestarien mestari
Mestarien mestari, or the Grand Master, is a being encountered in the Throne Room east of the Wizard's Den. It dons a helmet covering its face, and a purple cloak with three images of eyes pictured upon it. Upon Mestarien mestari entering its third phase, the helmet is seemingly destroyed, revealing a writhing mass of flesh beneath. The Grand Master is capable of using several different magical attacks, and is able to summon Mestari enemies to its aid. It is additionally able to attack using blood tentacles.
Due to its name, the name of its arena and the area preceding it, its extreme magical abilities, and ability to summon Mestari enemies, it can be reasoned that the Mestarien mestari may likely be or have been some sort of leader of the Mestari.
Items
Crystal Key and associated books
The Crystal Key is an item dropped by the Ylialkemisti; it is unknown how it came into their possession. The Crystal Key is used to unlock the Coral and Dark Chests, and is heavily tied with music. It shows that it is possible to imbue an object with magical properties via music.
Aside from the Ylialkemisti, it is possible that the Mestarien mestari was also aware of the Crystal Key's existence, that he may have known how to activate it, and that he may have been aware of the existence of the Coral Chest and Dark Chest, evidenced by the "A Cunning Contraption" book which he drops.
A Cunning Contraption
"The secret lies in music!
The key to the heavens' lock is borne from music all over the world.
And in a way, as above, so below..."
Alongside "A Cunning Contraption", there are three other books which refer to either the Coral Key, how to activate it, or the Coral or Dark Chests.
- "Research Notes", found in the Pyramid, and author unknown. This book hints to the locations of the four Music Machines needed to charge the Crystal Key in order to unlock the Coral Chest.
Research Notes
"One in the lake
One in the tree
One on the island
One under the sun"
- "Alchemist's Notebook", found in the Overgrown Cavern, with the specific alchemist that wrote it unknown. This book lists the two songs needed to charge the Crystal Key in order to unlock the Dark Chest. (See "Coral Chest, Dark Chest, and Altars" section for image.)
- "Book of the Key", found with the Refreshing Gourds beside the West Cloudscape, author unknown.
Book of the Key
"Once the Key has listened to you, bring it home...
One home in the sky, beyond the invisible steps...
One home in the underworld, below seas of magma..."
Huilu and Kantele
The Huilu and Kantele are two instrument shaped unique wands, found in the Cloudscape and inside of the giant tree respectively. Each instrument is accompanied by a selection of note spells, and it is unknown who put the wands and notes in their locations, or who created the wands and notes. Through playing select songs, the player can cause a few magical effects, such as summoning a portal to the mountaintop, summoning a worm, and more. This power is not tied to the wands, however, and is instead tied to the notes. These items further show the magical properties of music.
Notes
- Explanatory video by FuryForged